The iterative design process has a compounding effect.
Every time we launch a product, we get the opportunity to learn.
When we learn, we get the chance to improve.
The Design cycle drives us forward with every iteration and the more we involve our customers, the better our solution will be.
Iterative design is a process of problem-solving and having conversations. It’s a team sport – A deeply collaborative, cross-functional process requiring stakeholders’ full buy-in.
But what is The Design Cycle? The Design Cycle is a simple step-by-step design thinking model that combines research, problem solving and collaboration. It describes 4 key phases broken down into sub-sections that you can easily follow to produce new innovative ideas. It can be applied to any design challenge or scenario, and it’s perfect for developing new products and features, and solving problems in science, education, healthcare, and technology.
In this article, you’ll learn how to apply this process to create products your users love.
What Are the Benefits of the Iterative Design Cycle?
Design is about purpose, not products.
We look for situations that create a need for a new product or service. Then we move through an iterative design process to meet that need.
The iterative design process can feel messy. Even the most experienced practitioners need to pause to find their feet.
The difference between an amateur and a pro is that a pro knows to expect and deal with ambiguity. A pro knows to trust the process and let it guide them when things get tough.
Here’s what’s good about The Design Cycle:
- It’s a simple framework that’s easy to follow.
- It’s versatile and can be applied to any context.
- It can be lean, fast-paced, and great for iterative design.
- It’s suitable for any problem or scenario.
- It’s a flexible and non-linear iterative design approach.
- It’s grounded in user research and promotes evidence-based decision-making.
- It gives clear criteria to follow.
- It includes the person we’re designing for at crucial stages.
- It builds a strong knowledge based through continuous learning.
- It’s perfect for UX design, product design and product development.
The 4 Stages of the Iterative Design Cycle
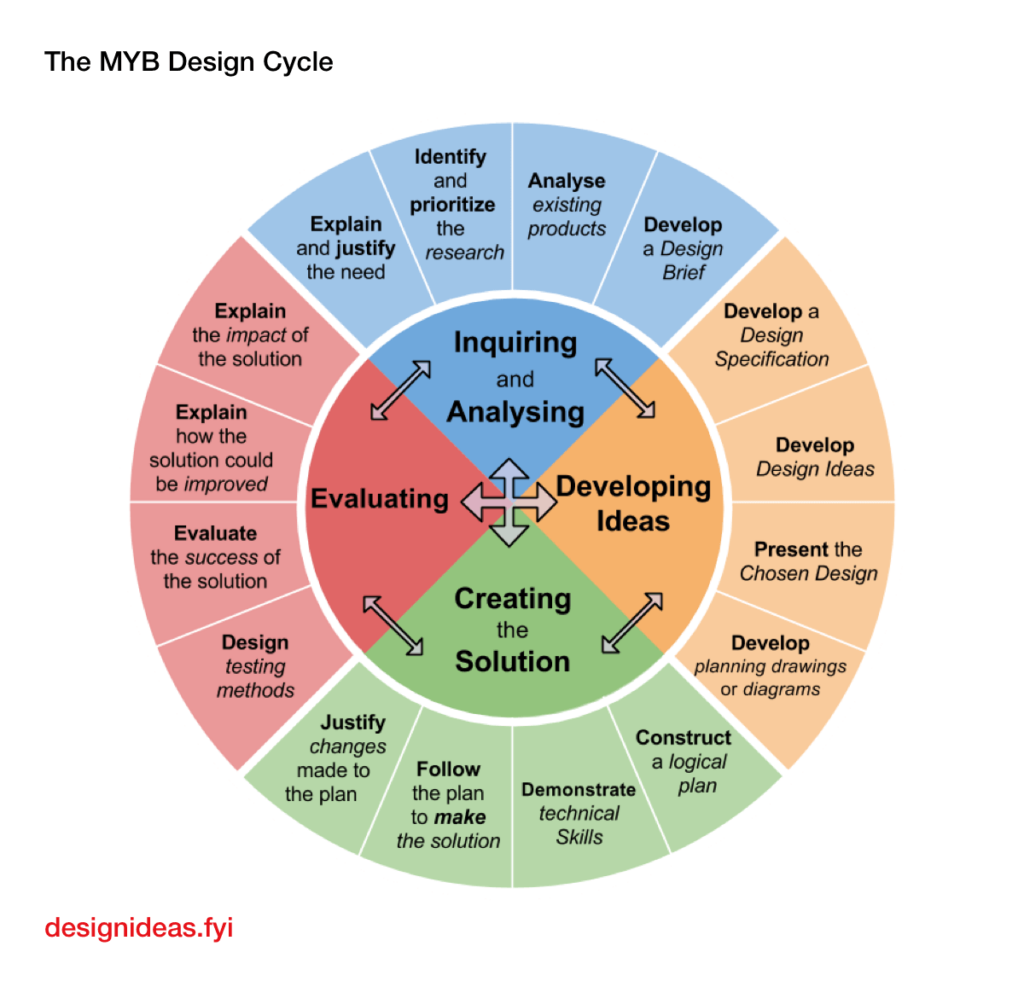
The design cycle is divided into 4 key phases, and each phase is divided into a series of steps.
Although the steps are in order, you can move back and forth as you need to. If you’re new to design thinking or the design process, we suggest moving through it step by step, but when you encounter complex problems, need more clarity, or feel like you need to go back or forward to help you think, then absolutely do that.
Everybody thinks differently, and every problem will require a nuanced approach, so don’t dwell or freeze if you get stuck; move to a step that feels right, and then when you’re back on track, reevaluate and move on.
Although each stage is essential, don’t skip steps entirely; instead, rearrange them when it feels right.
Inquiring and Analyzing
Without evidence, we’re guessing, and guessing is risky.
Sure, a guess can be a helpful starting point, but we want to gather data as soon as possible.
This data will give us a solid foundation to stand on, from which we can continue to build our knowledge base throughout the design process.
Data will provide evidence that our problem exists and confidence that it’s worth solving.
User research will give us clarity on the problem and deeper insight into how to design the solution.
The inquiry and analysis phase’s outcome is to have produced a design brief containing all the details needed to generate and test solutions.
Identify a Problem or Need
Every good innovation began as a well-defined problem or a well-understood need.
I include the words need and problem because, depending on the scenario, you can frame it either way.
Sometimes, framing a need as a problem can feel awkward and vice versa.
You need to go with what’s suitable for your situation. Try both and see what feels right.
You can identify your problem or need by reviewing data, analytics, and customer feedback or because it’s self-evident.
If you don’t have data, you can write a hypothesis explaining what you think the problem or need is.
Then, you can speak to customers and do further research to help you reframe, refine or restate your problem or need.
Research the Problem or Need
The user research will tell you if you’ve picked a good starting point.
It’ll help you get insight into the problem and articulate it clearly, so it’s evidence-based and actionable.
User research can give you confidence in your direction and a sense of how much of a problem or need there is.
Are customers responding enthusiastically to your questions?
Do they have stories to tell you, frustrations to vent and pain points to share?
If so, you could be on to something. Use this data to paint a clear picture of who your audience is and what they need.
The research you conduct should be qualitative and quantitative to give you a well-rounded view of the problem.
Your research can be a mix of primary and secondary research, and it should include understanding your organization’s strategies, plans, and goals.
Analyze Existing Solutions
A competitor analysis will help you understand what solutions already exist to the problem you’re attempting to solve. Try to find weaknesses, gaps in the market, or reasons why the existing solutions fail to meet your customers’ needs.
Your analysis will help you to find gaps and opportunities, and it’ll inspire you when writing your own design specification.
Try to think outside the box when deciding which existing solutions to analyse.
Not all solutions will be from direct competitors.
For example, socializing with friends could be seen as a competitor to the fitness industry since they both require some of your free time.
Find useful and inspirational examples and push your thinking in new directions.
Produce a Design Brief
Your design brief will give direction to the rest of your project.
It should contain helpful information, insights and considerations to help you and your team generate and test solutions.
Your design brief should include a well-articulated need or problem statement, who you’re designing for, their primary goals and pain points, key insights from your research, and how you’ll measure success.
If there are still outstanding research questions or areas you need to know more about – that’s ok – we can answer those questions during testing or when we cycle through the loop again. For now, choose the most meaningful insights to work with.
Your design brief can be in any format, it’s the content that’s important, and it should be easy to scan and read for your team and stakeholders.
Developing Ideas
It’s easy to skip user research and fall in love with an idea too early.
All reason goes out the window, and we start to believe that our belief alone signals we’re on the right track.
We must remain objective throughout this process and realize that evidence is our guiding star.
With that in mind, generating a wide range of potential solutions is vital to give ourselves the best chance of finding an innovative solution.
Write a Design Specification
Your design specification will direct our thinking when generating possible solutions.
The specification will need to describe the characteristics of the solution and ensure our ideas align with the research we’ve conducted and meet the criteria our customers require.
To help you write the specification, consider the following themes and questions:
- Purpose – What is the purpose of the design? What characteristics must it have? What features could it have?
- General design considerations – What materials will be needed? What tools and equipment will you need? What components will it have?
- Aesthetics – How should the design appeal to the target market? How should it make customers feel?
- Quality – What characteristics of the design will indicate quality? Will the product be durable?
- Environmental – Are materials recycled? How do we consider the environment? What waste is generated?
- Ethics and inclusivity – How will we ensure it’s inclusive?
Develop Design Ideas
Now that we’ve conducted our research, defined our problem and described the characteristics of the solution in our brief and specification, we need to get our creative hats on and brainstorm solutions.
We always start by going broad and generating a wide range of solutions, focusing on the number of ideas rather than their quality.
Ideation is a creative, generative phase in the process.
We aren’t critiquing or evaluating the ideas at this point; we aim to explore multiple potential ideas to find an inventive solution.
At the beginning of this process, we should value creativity and freedom of thought. Once you’ve generated a wide range of ideas, we put our critical hats on and change our attention to critique and evaluation.
We need to discuss, challenge, refine and develop our ideas before deciding which idea we’d like to take forward and test with our customers.
Present the Chosen Design
This is an opportunity to synthesize your thinking into a clear, concise pitch that describes your idea and the value it’s intended to create.
This will crystallize your thinking and help you refine your ideas and decide what’s important, and it’ll also help you inspire your team and persuade your stakeholders to commit to their support and resources.
Develop Plans or Diagrams
Plans and diagrams help us to think through how our idea could function. This will give us an idea of the technical feasibility and business viability. It’ll also help you to solidify what functionality your solution will need to include to deliver the intended customer value.
The format and detail needed for the plan will depend on the type of solution you’re creating: a physical product, a digital product, or a service.
A simple wireframe or sketch with some supporting specifications will do for a digital product.
For a complex physical product or piece of engineering, think more deeply about the components you’ll need to create to create the solution.
You’ll need to decide what’s best for you, but the goal here isn’t to produce high-fidelity designs. We don’t want to dwell too much on the specifics or get bogged down and risk losing our momentum.
We want to think through what functionality we need to deliver the intended customer value and enable our audience to complete their tasks.
Creating the Solution
All the thoughts and preparations in the world aren’t going to solve our problems.
We need to get feedback from the real world. We must speak with our intended audience and observe them interacting with our idea.
This is where the prototype comes in. Our prototype is what we use to show our idea to our customers.
Without a clear articulation or visualization of our idea, we wouldn’t be able to collect feedback.
We like to keep our prototypes low fidelity and easy to change or throw away if needed.
For your first few iterations, aim to create an MVP. A Minimum Viable Product (MVP) is the smallest thing you can build that delivers customer value. It’s the simplest representation of your idea that will allow you to learn and get feedback. It’s simply good enough to get customer feedback.
Construct a Logical Plan
Ask yourself, how are you going to build the prototype? Does it need to be fully functional, or can it simulate some core functionality? Does it need to be interactive, or will a static visual help validate your thinking?
Remember, we can cycle through the process multiple times, often during the first iteration; we need to validate that we’re solving the right problem in the right way.
In future iterations, we can commit more time and energy as we become more confident and have more data to base our decisions.
Early on, it’s about validating your idea; later on, it’s about refining and optimizing your idea.
Consider which stage you’re at, and what you need from the first iteration. It’s best to do this with the help of your stakeholders and technical consultants.
Follow the Plan to Make the Solution
At this point, you should have a plan on how to build your prototype and what it needs to include.
It should be detailed enough to build a prototype but lean enough that you can keep momentum – prioritise action and learning over perfection.
Use your plan to build your prototype, and keep it as lean and lightweight as it needs to be.
Remember, the prototype is a tool for learning and should therefore be designed around your learning objectives.
As the designer, it’s your responsibility to get advice from the development team, software development analysts and anyone involved in the development process.
Justify Changes Made to the Plan
As you’ve gone through your plan and built your solution, you’ll have no doubt found opportunities to improve your designs.
This is normal; it makes sense that when you move forward and gather more information, you’ll be able to make better decisions.
It’s only by getting started and doing the work that you really begin to understand your project.
However, you should be able to clearly articulate why you’ve made changes and what additional benefit the changes will bring to the solution. Or, if the changes are designed to facilitate learning during testing, that’s fine too; make a note and make sure you can explain this to your team and stakeholders.
Evaluating
We need to find out how customers react to our proposed solution.
We might believe we’ve nailed the problem. We’ve likely developed a bond with our idea and started to get excited.
We need to temper these feelings until we’ve evaluated our solution.
When we see them interact with our prototype and hear them describe how it could fit into their lives, we give ourselves valuable data that we can use to continue to craft our solution.
Design Testing Methods
There are a whole range of research methods for testing your solution.
You can go with a lean, lightweight guerilla testing style, or you can go with a more thorough, formal method.
You can do controlled lab testing with customers or take it out into the real world to see how it would be used in the proper context.
If your product is digital, like an app or website, you can also use remote tools to test it online.
The method you choose should support the research questions you have.
First, think deeply about what you want to learn and who you want to learn from, then decide which method would be best.
Prepare for your session, rehearse your test with your team and decide on how you’ll record the test and document the learnings.
Evaluate the Success of the Solution
After the tests, when everything is fresh in your mind, sit down and evaluate the success of your solution.
You can design criteria or use a decision-making matrix to help you organise your learnings.
It’s helpful to have a grid or table with your tasks listed for each test participant so you can mark whether or not they completed the task and what your observations were.
Include observations around usability and user experience that you and the design team found notable.
At the end of the test, you should have some quantitative data points that describe how successful the designs were.
You should also have quotes and observations explaining how customers interacted with the prototype and why they did the things they did.
Explain How the Solution Could Be Improved
At this stage of the process, we should feel enlightened, and the value of the previous steps will become clear.
You should start to feel more informed and knowledgeable about your customers and the problem you’re solving.
We’ll have collected insights and observations from our research and watched people interact with the prototype.
We’ve heard their stories and ideas about how this could meet their need.
We should have a list of problems, pain points and friction which we can solve during the next iteration.
Make sure you’ve prioritized these learnings into an actionable plan and that you understand all the insights you’ve gained.
Explain the Impact of the Design Idea
You should be able to tell the story of how customers have been impacted by your solution using evidence from your research.
In your explanation, try to use the words of the customer. Use videos, pictures and quotes to make the story real.
When people hear it from the customer’s mouth, in their own words, they’ll see the potential in your ideas.
Use this story to inspire your team, get buy-in from stakeholders and encourage people to support you in future iterations of the design solution.
What Are the Guiding Principles of the Design Cycle?
The Design Cycle has three principles that drive the process.
They represent the things we value most as problem solvers and innovators.
Inquiry
Inquiry is essential because it’s the process that enables us to gather the insights and observations we need to make informed decisions. Make sure that you give inquiry the weight it deserves within your project.
Action
We learn when we take action. Even from a standing start, the best way to move forward is to take one step at a time. With each step, the path gets clearer, and we can make better decisions as we become more informed.
Reflection
Reflection is separate from action because action is about doing, and reflection is about learning from what you’ve just done. If we don’t reflect, we don’t learn and can’t improve. Always make time for reflection.
Getting the Most Out of the Design Cycle
Collaboration
Collaboration lets us benefit from the skills and expertise of our team.
We feed off the energy of the people around us, and that momentum can help us break through blocks and endure to solve the trickiest of problems.
We’ll need help to build and execute the final idea, so collaboration is our opportunity to bring people into the process and give them a sense of contribution and ownership.
Rapid Prototyping
The faster we can get a prototype together, the quicker we can get feedback.
This speed will force us to focus on our idea’s absolute necessities and core components.
Because the prototype has been built quickly and with low fidelity, we can discard it and pivot speedily and efficiently.
When you spend too much time building a prototype, it can become too precious, and we’ll become resistant to feedback because we’ve invested so much time in it.
Cycle Through as Many Times as Needed
We all know the design process is iterative and cyclical, but we often treat it as linear. We ship and move on to something else.
Our best chance of success is to move fast, keep our work lean, and cycle through the process building up a knowledge base as we go.
Once we’ve shipped our solution, we get the most reliable – high-quality data.
This is when we should re-prioritize our problems and needs and decide whether or not to keep iterating.
When we establish upfront in our project plan that we’ll aim to cycle through the process multiple times, we set expectations and gain support.
Jump Around and Backtrack as Needed
There is no right way to move through this process. The path you take will very likely feel messy and indirect.
That’s ok because the process is about learning. Each step teaches you something new, and then you use that knowledge to decide the next best step.
If your intuition tells you that you need to revisit a step, then absolutely you should do that.
If later in the process, you start to question whether or not you’ve defined the problem correctly, then you should definitely go back and think it through some more.
Frequently Asked Questions
What Is the MYP Design Cycle?
The MYP Design Cycle is an iterative design thinking process for exploring and solving problems. It was created for the IB MYP program.
What Is the Purpose of the Design Cycle?
It’s an iterative development approach designed to help students understand and navigate the design thinking process. It’s used throughout the MYP curriculum as a problem-solving framework.
Is the Design Cycle a Design Thinking Methodology
Yes, it’s a design thinking framework.
What other Design Thinking Frameworks Are There?
There are so many excellent design methodology frameworks. The Double Diamond by The Design Council and The Design Sprint are both great examples of the iterative design process.